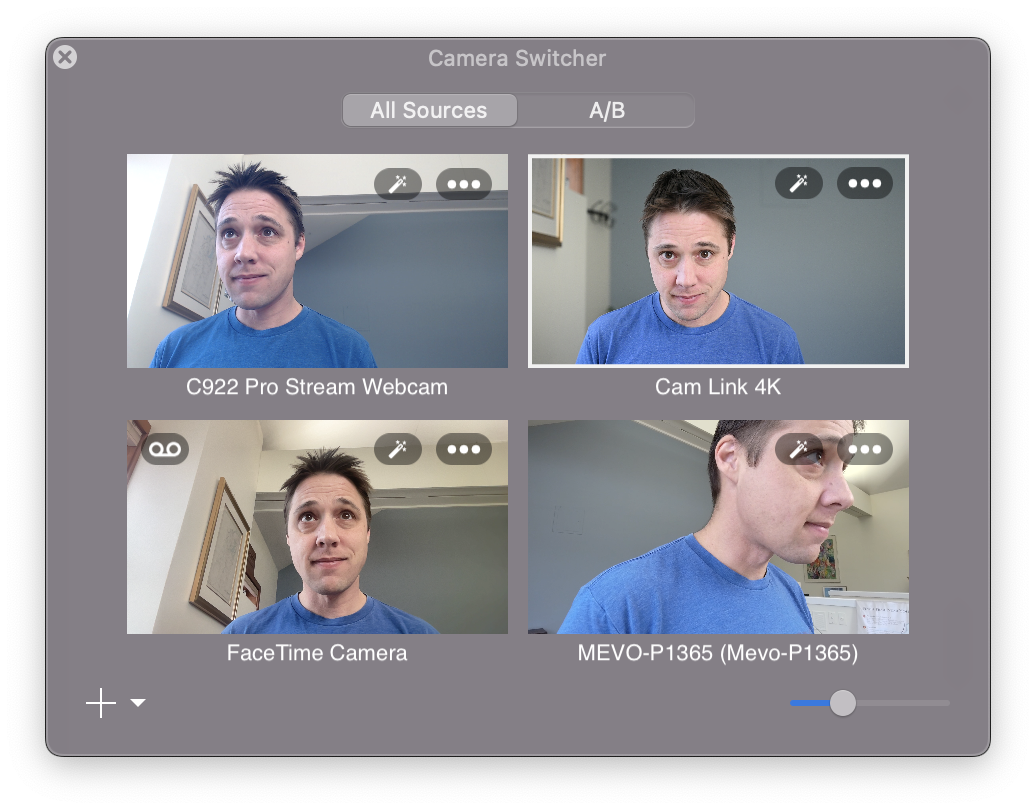
The Camera Switcher
If you don’t see the Camera Switcher window on the screen, click the button in the top-right corner of the Main Window to show it.

The Camera Switcher shows all of your connected video sources.
The size of the video previews can be adjusted using the slider control at the bottom of the window. The arrangement of the video previews can be adjusted by resizing the window. For example you may wish to view the previews as a horizontal row, a vertical column, or a grid.
Selecting a Video Source
Click a video source to use it in Camera mode.
Splitscreen (Selecting Multiple Sources)
If you would like to display more than one video source at the same time in a splitscreen layout or picture-in-picture, hold down the shift key on your keyboard, and click to select the video sources you wish to display. Ecamm Live will automatically split the screen to evenly display the sources. The video sources will automatically be cropped equally on their sides to fit the space if necessary, centering the video. Before going live, if you plan to use a two-or-more-source split screen layout, you’ll want to ensure all participants are in the center of their camera view.
Drag to Add a Camera Overlay
To add a Camera Overlay, simply drag a video source from the Camera Switcher window to the Main Window. You can also drag to an existing Camera Overlay to change its input source.
Video Source Options
Each video source in the Camera Switcher has a button to quickly access the source’s Camera Effects.
Cameras that support pan-tilt-zoom (PTZ) controls will also have a button.
Each source has a button to access additional options:
Show Source in Separate Window Show the video source in a separate window on the Mac.
Source Video Monitor Show the video source on a connected display or AirPlay device. (Requires an Ecamm Live Pro plan.)
Show PTZ Controls Show the camera’s PTZ controls. (This option only shows up for PTZ cameras.)
Set As Default Camera Ecamm Live will use the default camera in newly created Camera Scenes, and fall back to the default camera if a camera can’t be found.
Remove From Switcher This will hide the video source in the switcher, and the source will not run unless it is being used in the current scene.
Click-To-Start Sources
Certain video sources will not start automatically unless they are currently being used in your scene. This includes RTSP network cameras, Apple Continuity Camera sources, and iOS device screen sharing sources.
Placeholder Cameras
By default, you’ll be working with your video inputs directly, assigning sources to be used in your scenes. However you may choose instead to work with placeholder camera sources. This can be useful if you video source is not currently available or subject to change.
View placeholder cameras by clicking the A/B button at the top of the Camera Switcher window. Camera A and Camera B will now be listed in the Camera Switcher. Use the popup menu in each placeholder camera preview to assign a video source to the placeholder camera.

Adding A New Placeholder Camera
If you need additional placeholder cameras (Camera C, Camera D, etc.), pick Add Placeholder Camera from the + menu at the bottom of the Camera Switcher window.
Removing A Placeholder Camera
To see fewer placeholder cameras, click the button for a placeholder camera, and choose Remove Placeholder. Note that you cannot remove Camera A or Camera B.
Camera Effects
Each placeholder camera has its own Camera Effects settings. This can be helpful if you need more than one zoom level or green screen backdrop assigned to a video source.
PTZ Camera Presets
Cameras that support Pan-Tilt-Zoom (PTZ) preset positions will provide a sub-menu to select a preset position for the placeholder camera. For example, Camera A could be assigned to a camera’s preset position 1, and Camera B could assigned to preset position 2. The camera will recall the desired preset position whenever the associated placeholder camera is included in the current Scene.

