Using Overlays
What are Overlays?
Overlays are styled text, shapes, images and animations in your broadcast. If you don’t see the Overlays Window, you can show it by clicking the in the upper right corner of the Main Window or show it using the Overlays menu at the very top of your display.
There are eight types of Overlays:
Text Overlays
Any need for text on the screen can be addressed with Text Overlays. There are two main types of Text Overlays:
Dynamic Text Overlays
Dynamic Text Overlays are ideal for quickly adding a short line of text such as a title. The shape of a Dynamic Text Overlay will be determined by the shape of the text contained within it. When a Dynamic Text Overlay is resized, the text’s font size will also change.
Text Box Overlays
Text Box Overlays are for adding a larger block of text to a broadcast. The shape of a Text Box Overlay is defined by dragging from an edge or corner, and will never change when the text within it changes. The text will always be displayed using the font’s point size and will not change when the overlay is resized. If the text doesn’t fit inside the overlay’s area, it can either shrink to fit within the overlay, or simply be truncated.
There are four ways to add a Text Overlay:
- Select New Dynamic Text Overlay or New Text Box Overlay in the Overlays menu at the top of your display
- Click the or buttons at the bottom of the Overlays Window.
- Type ⌘N or ⌘optionN
- Copy text from anywhere on your Mac. Edit menu ➝ Paste as Overlay will allow you to paste in plain or styled text.
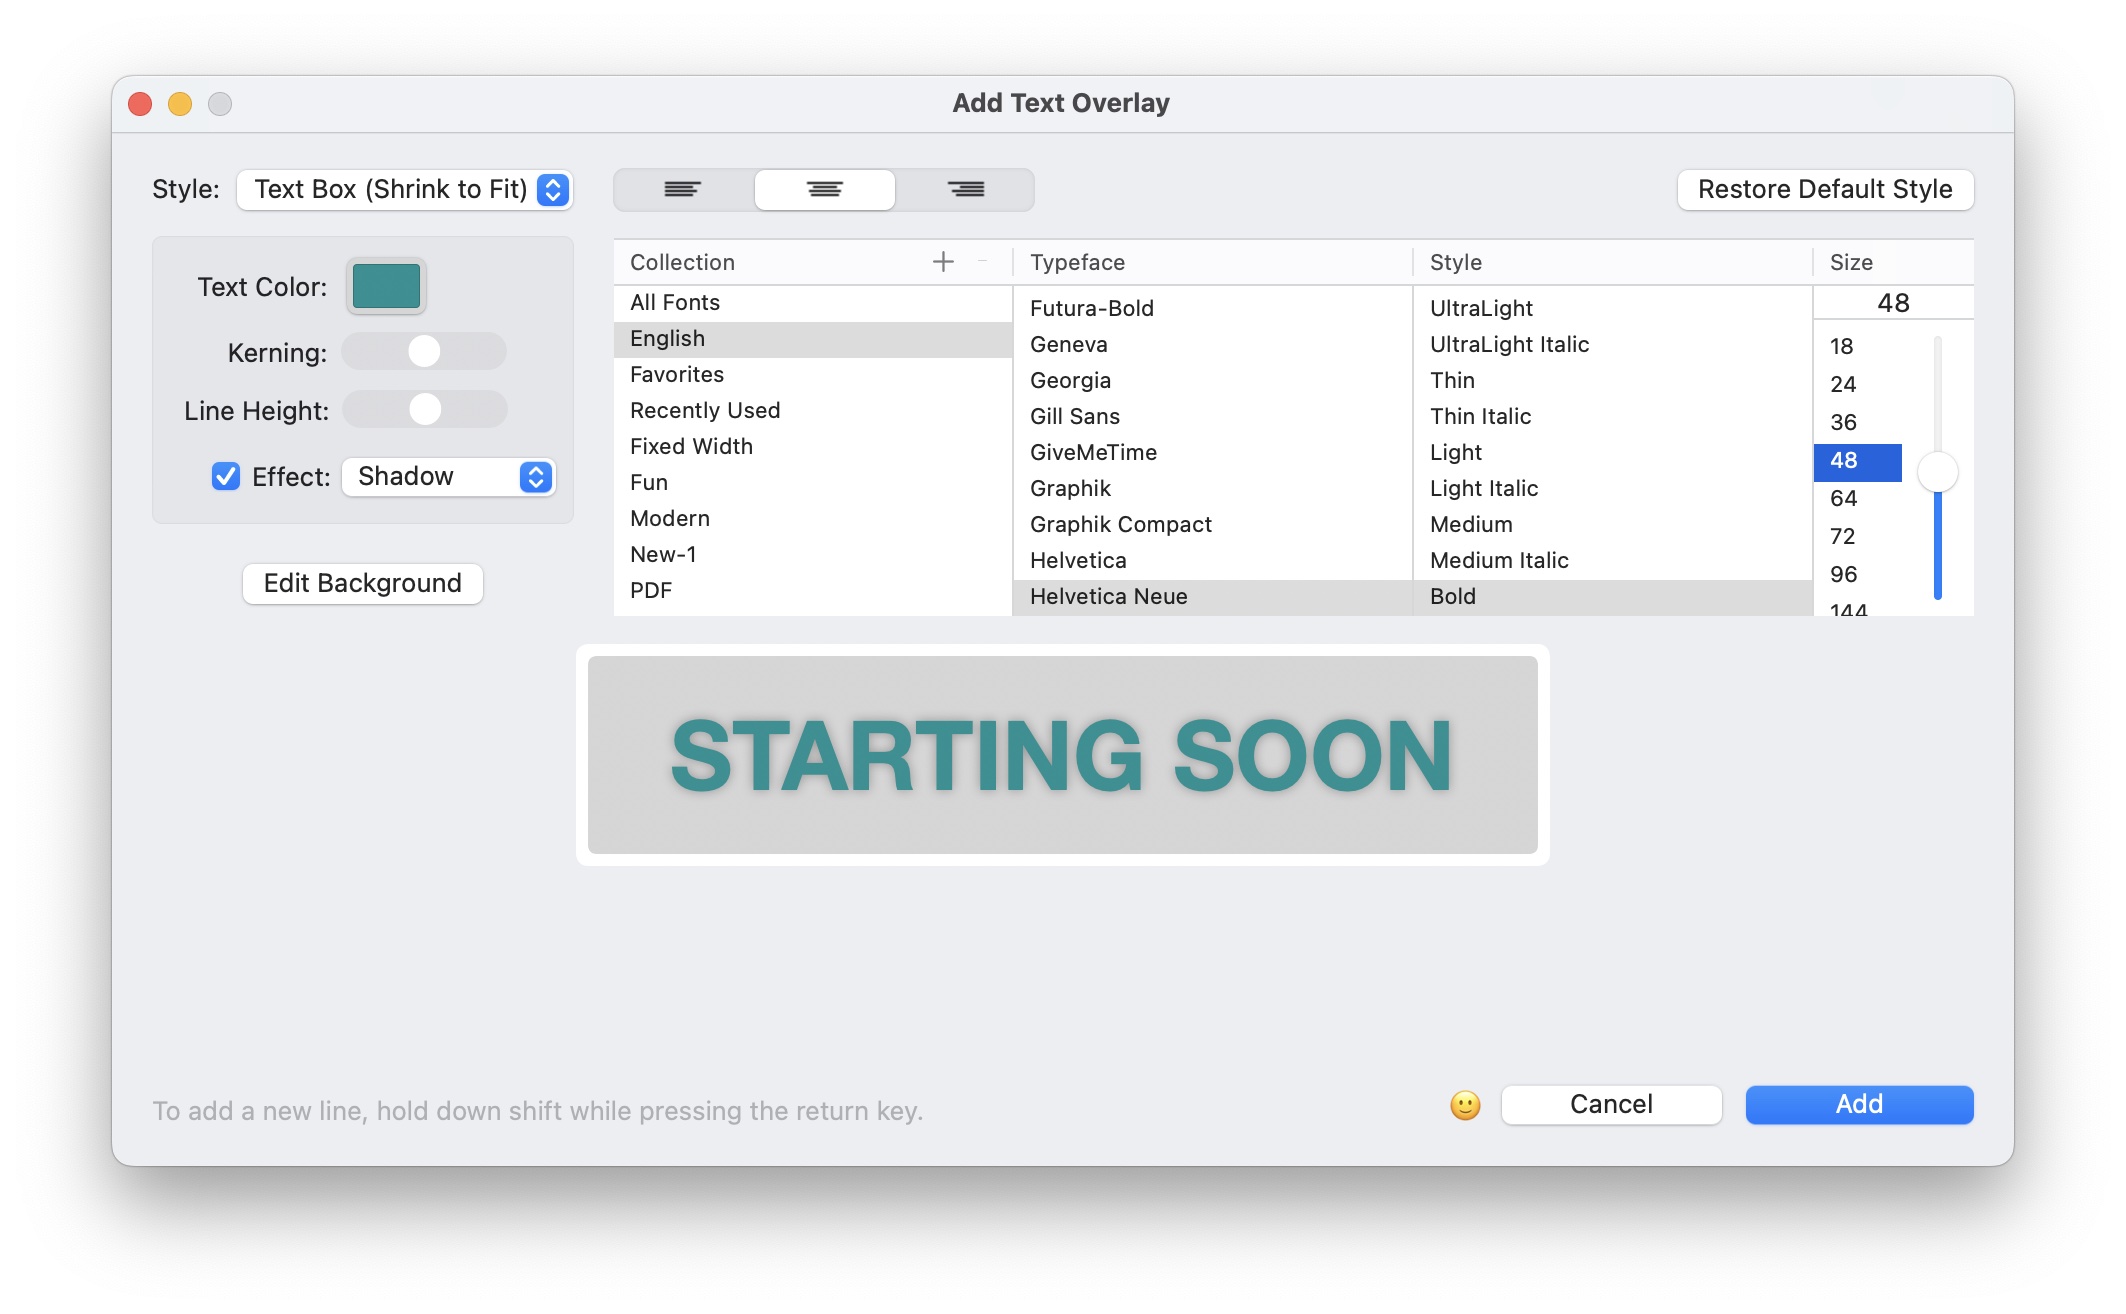
When you create a new Text Overlay, a Text Editing Window will appear. Start typing to enter text. You can hold the shift key and press the return key to insert a line break. You can change many properties including font, font size, text color, kerning (the spacing between characters), and line height. You can apply any of these properties to individual lines or chunks of the text by highlighting them, and selecting your styles.
Use the Edit Background button to make changes to the text’s background color, border, and margin width.
You can apply a shadow or an outer glow effect to all of the text. To add an emoji, click the 😀 smiling emoji button and select from the menu.
Adding A New Line
To add a new line to a Text Overlay, press return while holding down the shift key. (Pressing return without the shift key will save the changes and dismiss the window.)
Once you click Add in the Text Editing Window, your Overlay will appear in the Main Window.
Editing Text Overlays
To change the text of the Overlay, click the Edit Text... button at the top of the Overlay’s settings popover.
To change the width of a Dynamic Text Overlay without changing the font size, place your cursor over the right edge of the Overlay. Once the cursor switches to a left-right arrow, drag left or right to adjust the width. Once you’ve adjusted the width, the width will remain fixed. To return to an automatically-sized width, double-click the right edge area, or right-click on the overlay and pick Clear Fixed Width.
Changing The Text Box Style
The Style menu in the Overlay’s settings popover can be used to change a Text Overlay’s style between Dynamic Text, Text Box (Shrink), Text Box (Truncate), and Scrolling Ticker.
Text Background Options
Use the Background menu in the Overlay’s settings popover to pick a background. A background can be a solid color, linear gradient, motion gradient, or a visual effect such as a blur.
Text Margin Size
Use the Text Margin slider in the Overlay’s settings popover to determine how much space there is around the edges of the text.
Cutout Text
The Cutout Text option can be found in the More Options section of the Overlay’s settings popover. Cutout Text mode will create a text-shaped cut out in the Overlay’s background color, allowing the scene’s background to show through.

An example of cutout text.
Scrolling Tickers
You can add a scrolling text ticker overlay using all of the steps above for a Text Overlay. At the top of the Text Editing Sheet, pick Scrolling Ticker as your Style.
To adjust the speed of a ticker, once it has been created, move your mouse arrow over the overlay in the Main window. You will see a speed control slider show up.
Image Overlays
Would you like to show your company logo in the corner of your broadcast? That’s one of the most common uses for Image Overlays. But there are many possibilities. If you’d like to go beyond the styling capabilities of Text Overlays, you can design text and lower thirds in a graphics app, such as Photoshop, save them as an image, and add them to your broadcast as an Image Overlay. This is a powerful way to supplement your broadcast’s branding. You can simply drag and drop any image file into the Main Window to instantly create a new Overlay. Or if you prefer, there are several other ways to create an Image Overlay:
- Drag an image file from the Finder or another app into the Overlays Window.
- Select New Image Overlay in the Overlays menu at the top of your display
- Click the button at the bottom of the Overlays Window.
- Type shift⌘O while in the Main Window. A file selection sheet will appear, allowing you to find and select one image file. Select a JPG, PNG, GIF, WebP or PDF file.
Multi-Page PDFs
When a multi-page PDF file is added as an Overlay, you will see page controls show up when your mouse cursor moves over the Overlay. Use the left and right arrow buttons, or the arrow keys on your keyboard to move through the PDF pages. To jump to a specific page, click the page number area.
PDF overlays can be displayed with a transparent background if desired. Control-click or right-click on a PDF overlay, and choose PDF Options ➝ Transparent Background from the contextual menu. Note that the PDF itself must already have a transparent background for this to work properly.
Animated GIFs are also supported—let’s use that last one responsibly, shall we?
ProTip: When creating an image in an external graphics application for an Overlay, PNG is a great format. PNG saves losslessly (without visible degradation from data compression), and can have an alpha channel (allowing parts of the image to be transparent.) This can add an additional pro touch to your onscreen look.
Animated Overlays
Animated Overlays work just like Image Overlays but use a video file instead of an image. This is great for an animated logo or lower third. With the exception of WebM formatted videos, animated overlays will play without sound.
Video files with transparency are best. These can be created in apps such as Adobe After Effects, and should be saved as Apple ProRes 4444, WebM or HEVC video formats. (Other formats will play, but won’t have transparency.)
There are 4 ways to add an Animated Overlay:
- Drag a movie file from the Finder into the Overlays Window.
- Select New Animated Overlay in the Overlays menu at the top of your display.
- Click the button at the bottom of the Overlays Window.
- Type shiftoption⌘O while in the Main Window. A File Selection Sheet will appear, allowing you to find and select a movie file.
Animated Overlay Playback Options
To pause or play an animated overlay, place your cursor in the middle of the Overlay, and you’ll see a small movie player bar show up, with a play/pause button, scrub bar and an options menu. Click the tiny down arrow to find the Options menu. Options include Auto-Play, Loop, and options to hide the overlay when finished with playback.
By default, animated overlays will start playing from the beginning. If you’d prefer the animation to start from where you left off previously, choose Start From Last Location from the player bar’s menu.
Green Screen and Blue Screen Blend Modes
Image Overlays and Animated Overlays offer a Green Screen and Blue Screen keying option in the Blend Mode menu in the Overlay’s settings popover. (Find this in the More Options section.) Use this to add transparency to images and videos that have a green or blue background. Once picked, a Fade Level slider will show up, which can be used to adjust the keying threshold.
Comment Overlays
If you’re broadcasting with Facebook Live, YouTube Live, Amazon Live, Restream, or Twitch, and you receive a comment, you can drag that comment from the Comments and Reactions Window into the Main Window. Ecamm will automatically convert your comment into a styled text Overlay, matching the style of your most recent Comment Overlay. If you want two different Comment Overlays to appear on screen at once, drag a second comment to the Main Window.
You can also click the tiny Add To Broadcast button below each comment or click the comment’s avatar image to place the comment on screen. This feature remembers the placement and style of a previous Comment Overlay. If there’s currently a Comment Overlay on screen, clicking a different comment in the Comments & Reactions window will replace the currently displayed Comment Overlay. This is useful for clicking through a series of comments in succession.
Editing Comment Overlays
The text in a comment Overlay can be edited and styled just like a Text Overlay. (Double-click the overlay and then click Edit Text... in the Overlay’s settings popover.) Once a Comment Overlay is styled, future comments remember this styling. A separate style can be applied to the comment author.
Positioning and Styling Comment Overlays in Advance
Comment Overlays will use the position, size, and style of previous Comment Overlays. To set up the appearance of Comment Overlays in your Scene, pick Add Placeholder Comment Overlay from the Overlays menu or press ⌘optionK. A placeholder Comment Overlay will appear, which can be styled and positioned as desired. Once you have finished, it can be deleted. Subsequent comments will use this position, size and style.
Adjust Comment Overlay Avatar Size
Comment Overlays include an avatar image of the viewer. Adjust the maximum size of the avatar using the slider control above the avatar. The setting will apply to all Comment Overlays in the Scene.
Showing The Most Recent Comment as an Overlay
Use the Add Last Comment As Overlay menu item in the Overlays menu to add the most recent comment as a Comment Overlay. The key command ⌘K or the Show Comment Stream Deck key can also be used.
Hiding The Current Comment Overlay
Use the Hide Last Comment Overlay menu item in the Overlays menu to hide the current Comment Overlay. The key command ⌘J or the Hide Comment Stream Deck key can also be used.
Hiding Comment Overlays Automatically
Use the checkbox in the General section of the Preferences to automatically hide Comment Overlays after a specified amount of time.
Countdown Overlays
If you need to display a countdown timer on screen, clock, or stopwatch, use a Countdown Overlay.
There are 3 ways to add a Countdown Overlay:
- Select New Countdown Overlay in the Overlays menu at the top of your display
- Click the button at the bottom of the Overlays Window.
- Type shiftoption⌘C while in the Main Window.
A Text Editing Window appears, providing all of the same visual styling options as with a Text Overlay. Pick a countdown type, such as countdown, clock, or stopwatch. You can edit the End Time and text alignment. Press Add to display your timer within the Main Window.
To edit an existing countdown’s settings, click the Edit Countdown... button at the top of the Overlay’s settings popover.
Auto-Start Option
When using a countdown type other than Clock, you will see an Auto-Start checkbox. Check this checkbox to have the countdown start running automatically upon creation, upon switching to the Scene, upon publishing in Preview Mode, and upon starting a broadcast.
Go To Next Scene When Finished
When using a countdown, you will see a Go To Next Scene When Finished checkbox. Select this to automatically transition to the next Scene in the Scenes window when the countdown reaches zero.
Shape Overlays
Use shape overlays to add a rectangle, square, circle, or squircle shape to your show. The shape can be a solid color, a linear gradient, a motion gradient, or a visual effect such as a blur, mosaic, or distortion.
There are two ways to add a Shape Overlay:
- Select a shape from the New Shape Overlay sub-menu in the Overlays menu at the top of your display.
- Click the button at the bottom of the Overlays Window.
Visual Effects
Shape overlays can be used to apply a visual effect to the broadcast. Visual effects can also be used as the background of Text Overlays. Pick an effect in the Fill menu in the Overlay’s settings popover. (For Text Overlays, use the Background menu.)
- Blur: Apply a gaussian blur.
- Zoom: Apply a zoom blur.
- Motion: Apply a motion blur.
- Pixelate: Apply a square mosaic pattern.
- Hex: Apply a hexagonal mosaic pattern.
- Comic: Apply a comic book effect.
- Twirl: Apply a twirl distortion.
- Pinch: Apply a pinch distortion.
- Bump: Apply a bump distortion.
Camera Overlays
Use a Camera Overlay to add a live camera view to the broadcast.
There are 3 ways to add a Camera Overlay:
- Select a camera from the New Camera Overlay sub-menu in the Overlays menu at the top of your display.
- Click the button at the bottom of the Overlays Window.
- Drag a video source from the Camera Switcher window to the Main Window.
A Camera Overlay will show up in the center of the Main Window.
Editing Camera Overlays
In the Camera Overlay’s settings popover, a camera source picker and shape options will appear. If you need a shape that isn’t listed in the shape menu, pick Custom from the list of shapes. Then adjust the shape by dragging the Overlay from any corner.
Showing Guest Names Automatically
The settings popover will also include a Show Guest Name checkbox. This applies to Interview Mode guest and Zoom guests. Check this checkbox to automatically add a text overlay containing the guest’s name.
Screenshare Overlays
If you need to quickly position a screenshare to create a custom layout, use a Screenshare Overlay.
There are three ways you can add a Screenshare Overlay:
- Select New Screenshare Overlay from the Overlays menu at the top of your display.
- Click the button at the bottom of the Overlays Window.
- Type shiftoption⌘S while in the Main Window.
A Screenshare Overlay will show up in the center of the Main Window.
Editing Screenshare Overlays
In the Screenshare Overlay’s settings popover, screenshare source and shape options will appear. If you need a shape that isn’t listed in the shape menu, pick Custom from the list of shapes. Then adjust the shape by dragging the Overlay from any corner.
Zoom To App Windows
Check this checkbox to automatically adjust the size of the screen capture to just the window being shared.
Include Desktop
Check this checkbox to include the desktop image and icons. When sharing an individual app or app window, unchecking this checkbox will result in a transparent background.
Activate System Audio Capture
Check this checkbox to automatically turn on system audio capture when the overlay is visible. This option requires setting Broadcast System Audio to When Sharing The Screen in Ecamm Live’s Audio Preferences.
Green Screen Key
Checking this checkbox will cause any chroma green in the screen share to be transparent. It will also make the desktop area transparent. This option is useful when used in conjunction with a PowerPoint or Keynote presentation that includes a green background.
Widget Overlays
Ecamm Live supports displaying web widgets as Overlays. Widgets are transparent web pages designed to be overlaid on a live stream. They typically include dynamic content such as alerts and chat messages. Streamlabs widgets are a quick way to get started. Widget overlays can also be used to simply embed a website into your broadcast.
There are 5 ways you can add a Widget Overlay:
- Select New Widget Overlay in the Overlays menu at the top of your display
- Click the button at the bottom of the Overlays Window.
- Type option⌘W while in the Main Window.
- Drag a web URL from the Finder or your web browser’s address bar into the Main Window or Overlays Window Window.
- To add a local HTML or Javascript file as a widget, drag the file from the Finder into the Main Window or Overlays Window Window.
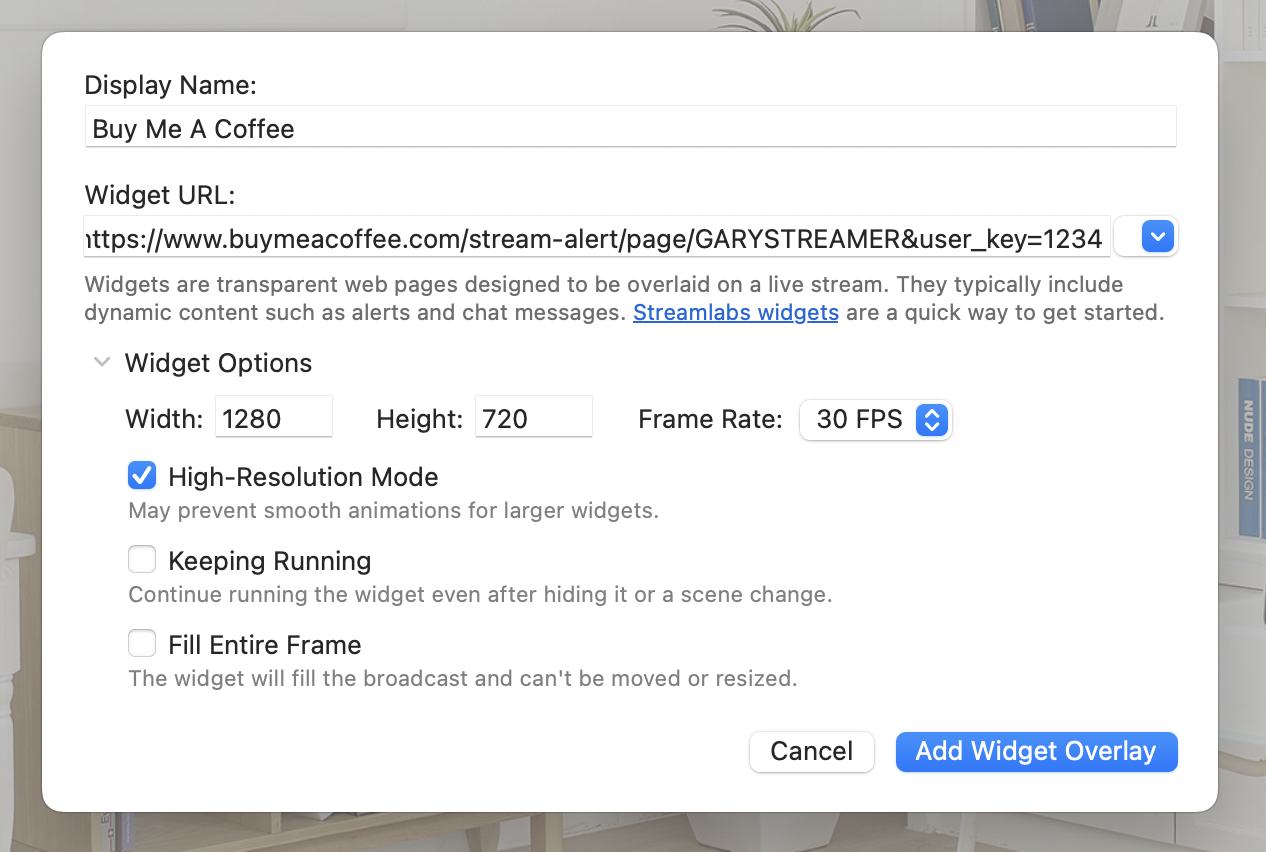
Clicking the button or selecting New Widget Overlay in the Overlays menu will bring up a sheet to enter a URL and several options:
-
Display Name: Enter a name for the widget. This is used for display purposes only, to identify the Overlay later.
-
Width and Height: Indicate a width and height for the widget. This will determine the scale of the widget.
-
Frame Rate: By default, the widget’s contents will update 30 times per second. You may wish to decrease it for performance reasons.
-
High-Resolution Mode: Activate high resolution mode for more fine detail in your widget. This is good for showing websites, but may result in slower updating for widgets that include animations.
-
Fill Entire Frame: This checkbox will make the widget fill the entire broadcast area. When using this option, the overlay cannot be resized or moved around like a normal overlay.
-
Keep Running: This checkbox will keep the widget running even after hiding the Overlay or leaving the Overlay’s Scene. This is helpful for Overlays that shouldn’t be reloaded or that take a while to load up. However, this should be used judiciously as once loaded, the widget will remain running in the background until the Ecamm Live app quits.
Editing Widget Overlays
To return to the widget’s settings, click the Edit Widget... button at the top of the overlay’s settings popover.
Interacting With Widget Overlays
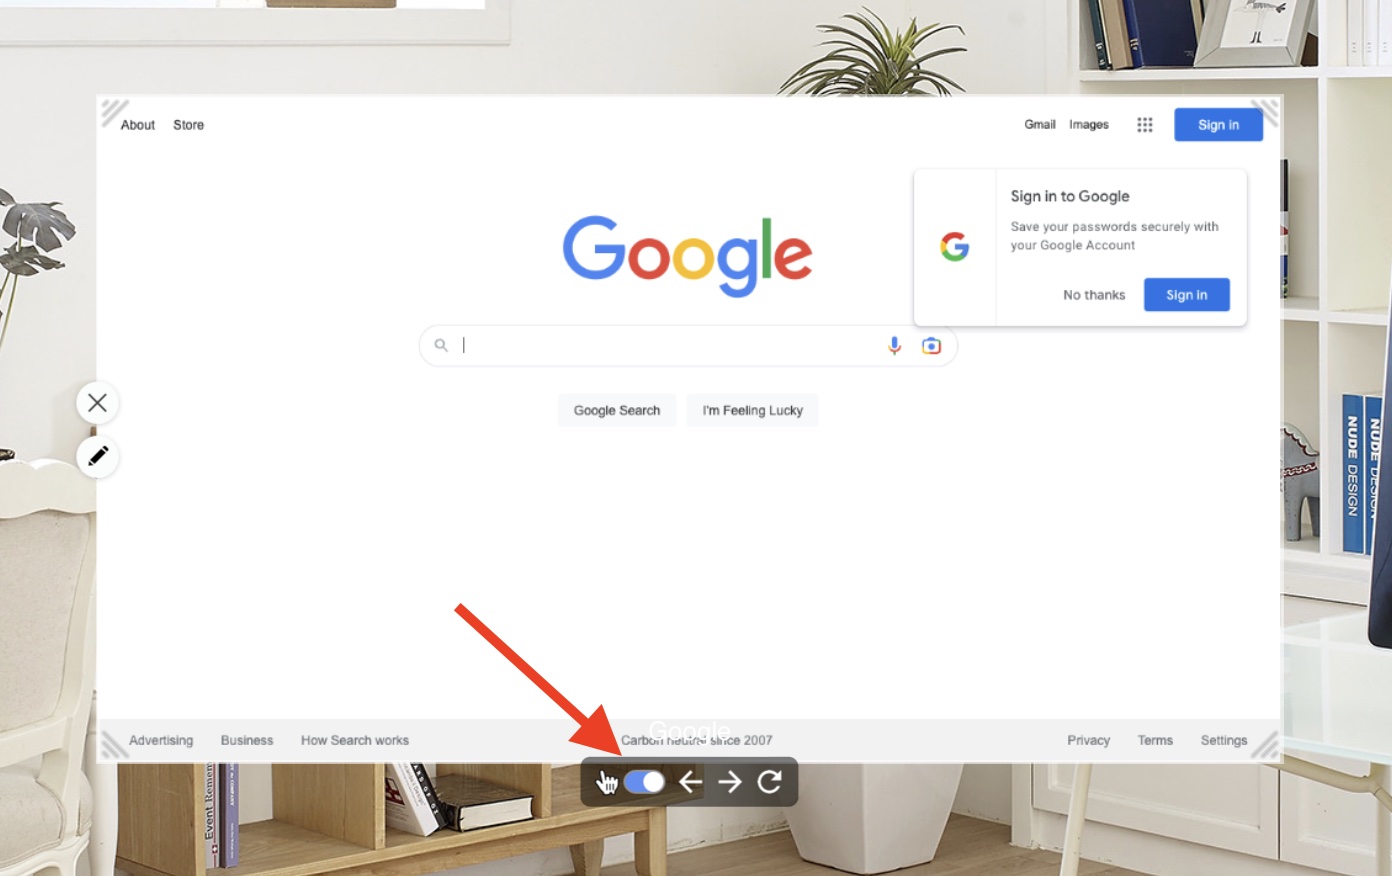
By default, widgets are not interactive, for example you won’t be able to scroll a website or click a link. To turn on interactivity, use the switch at the bottom of the widget. (See below.)
The Overlay Settings Popover
Clicking the icon beside an overlay or the tiny icon in the Overlays Window will bring up a popover window containing various settings for each Overlay. Double-clicking an Overlay will also bring up the popover.
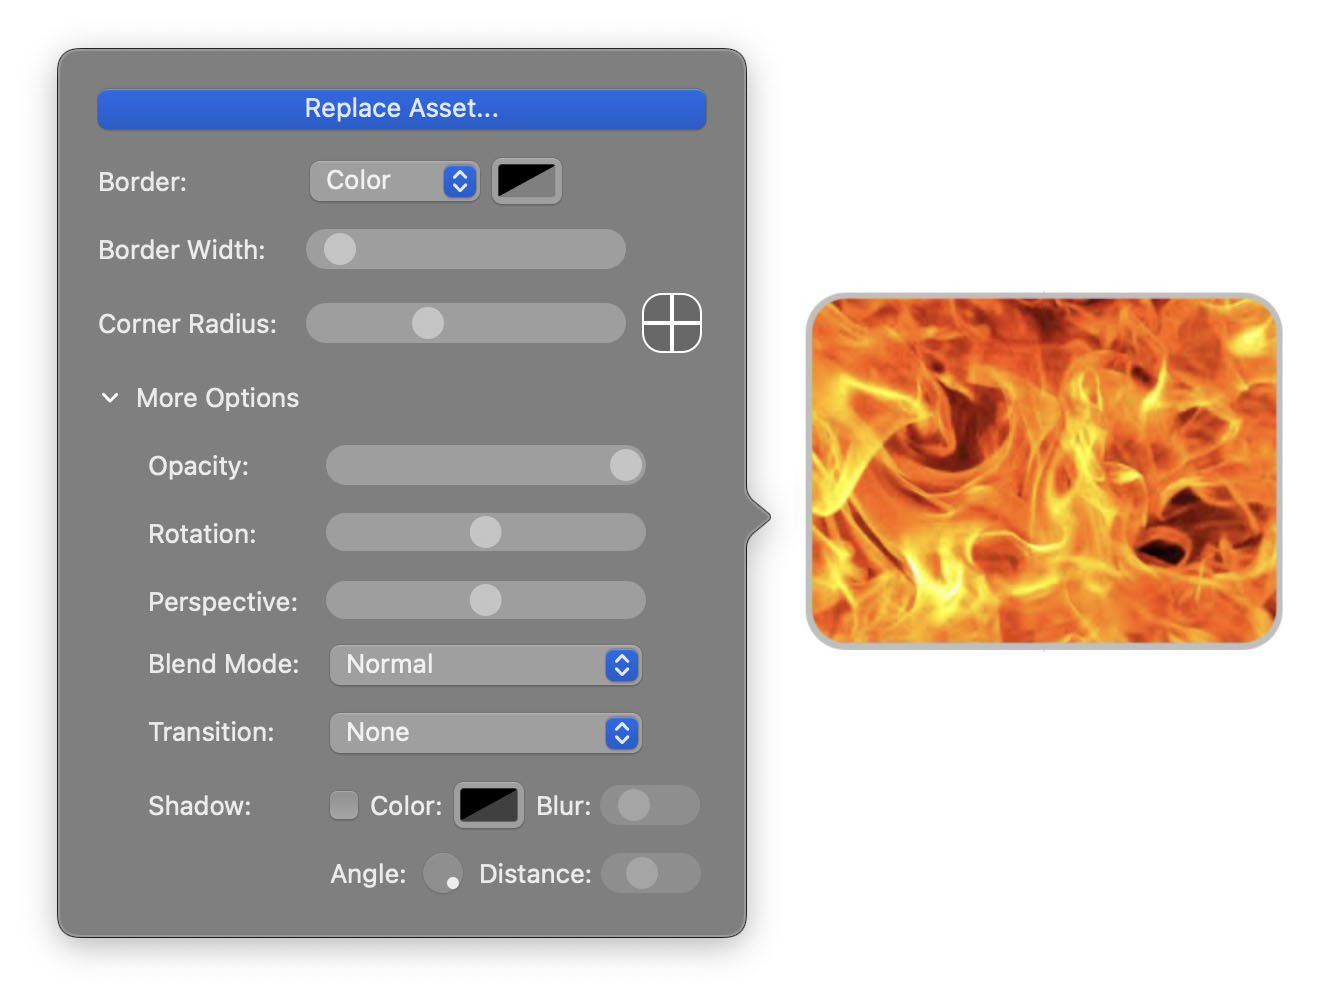
Many settings have already been mentioned above. Several are common to all Overlay types:
-
Border: Choose no border, a solid color, linear gradient, or moving linear gradient.
-
Border Width: Adjust the border width for the Overlay.
-
Corner Radius: Use this option to add rounded corners to any Overlay. The corner controls can be used to round only certain corners.
-
Opacity: Make the Overlay transparent.
-
Rotation: Adjust the rotation angle of the Overlay.
-
Perspective: Apply a 3-D perspective effect to the Overlay.
-
Blend Mode: Blend modes can be used to create artistic scenes.
-
Transition: Overlays can slide or spin onto the screen from the left, right, top, or bottom.
-
Shadow: Add a drop shadow with a customizable color, angle, distance, and blur level.
Hint: Fine-tuning adjustments can be applied to slider controls by pressing the arrow keys on your keyboard while the mouse arrow is over a slider.
Hiding, Positioning, Resizing
To hide an Overlay, place your cursor over the Overlay. Icons will appear on its left. The hides the Overlay. You can bring the Overlay back to the screen by clicking the next to the name of the Overlay in the Overlays Window, or selecting it from the Overlays menu at the top of your display.
To position an Overlay, place your cursor in the middle of the Overlay and drag. To make fine adjustments, click the Overlay and then use the arrow keys on your keyboard to move the overlay 1 pixel at a time. Hold down shift while using the arrow keys to move the Overlay in 10-pixel increments.
To move an Overlay on one axis, (horizontally or vertically), drag the overlay while holding down the shift key.
Automatic Overlay Alignment
As you position or resize an Overlay, it will automatically align itself to other overlays. To temporarily disable automatic alignment, hold down the command key while dragging the Overlay. To change alignment behavior, change the Automatic Overlay Alignment setting in the General section of the Preferences
Duplicating Overlays
To quickly duplicate an Overlay, drag while holding down the option key. (The key may be labeled alt on some keyboards.)
To adjust the Overlay’s size, drag from any corner or edge. You may also use your trackpad’s pinch-to-zoom gesture, or your mouse’s scroll-wheel or scroll gesture to resize an Overlay.
 —Pinch to shrink
 —Spread to enlarge
Rotating Using the Rotate Gesture
If your Mac has a trackpad, Overlays can be rotated using a gesture. Using two fingers on the trackpad, perform a twisting motion.
Adjusting Overlay Opacity Using the Scroll Gesture
To quickly adjust an overlay’s transparency, use the scroll gesture (slide two fingers on a trackpad) while holding down the shift key.
Cropping Overlays
With the exception of Text and Shape Overlays, Overlays can be cropped from any edge. Crop by holding down the option key on your keyboard while dragging any edge of an Overlay. (The key may be labeled alt on some keyboards.)
To reset the crop, right-click or control-click the Overlay and pick Reset Crop.
Copying Overlay Styles
To copy an Overlay’s style to another Overlay, click on an Overlay, and pick Copy from the Edit menu. Or, right-click or control-click on an overlay and choose Copy.
Then click on the Overlay that you’d like to change. Pick Paste Overlay Settings from the Edit menu. Or, right-click on the Overlay and pick Paste Settings.
For Text Overlays, you’ll also see an option to Paste Text Style.
Managing Your Overlays
The Overlays Window offers several options for managing your Overlays.
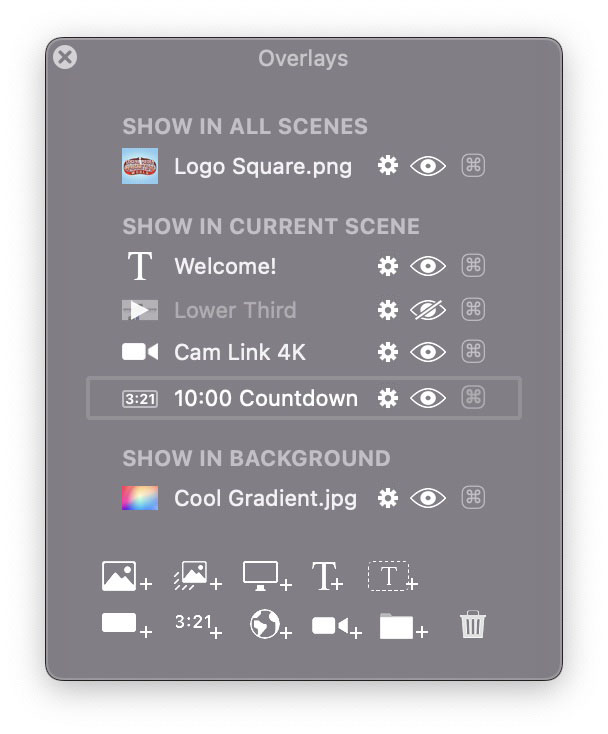
To delete an Overlay, select any item in the list and press your delete key, drag to the icon, or click the icon. The item will vanish. Trash an Overlay by mistake? Don’t panic. Edit ➝ Undo or ⌘Z will bring it back.
You can show or hide a given Overlay by clicking its icon. You can reorder the Overlays by dragging them up or down. This can be helpful for organization, but if you have any Overlays that overlap, the items that are listed higher on the list will be “on top” of the items lower on the list.
If you need to further organize, you can create folders to group Overlays. Click the icon to create a new folder. Drag Overlays onto the folders to organize. Folders can be hidden or shown just like individual Overlays using the icon.
Overlays Window Sections
The Overlays Window has three sections:
- Overlays in the SHOW IN ALL SCENES section will show up throughout your entire broadcast, regardless of your current Scene.
- SHOW IN CURRENT SCENE Overlays will show up in the current Scene. This list of Overlays will change as you change Scenes.
- SHOW IN BACKGROUND Overlays will show up behind everything else in your broadcast.
There are only a few specific cases where you will be able to see a Background Overlay:
- When in Blank Source mode. (Find Blank in the Source menu.)
- When Green Screen mode is used and the Transparent checkbox is activated.
- When the Camera source is zoomed out using the Zoom & Pan settings.
Note that only images and video files can be used for a Background Overlay. Upon being added to this section, the Overlay will be resized to fill the broadcast area. Background videos will loop automatically.
Hot Keys
Click the ⌘⃣ symbol to assign a hot key to show or hide an Overlay. The hot key can be used with a modifier key (shift, command, option, alt), a combination of modifier keys, or with no modifier key.
Locking Overlays
You may wish to lock an overlay to prevent it from getting accidentally moved around or resized. This is especially useful when using a frame-style overlay. To lock or unlock an overlay, click the padlock icon beside the Overlay in the Overlays Window. Or, right-click or control-click on an overlay, and choose Lock Overlay from the menu that shows up.
Linking Overlay Groups
A collection of overlays can be moved around the Main Window together as if they were one Overlay, by using Linked Groups. To link a group of Overlays, first add them to a folder Group. (See above.) Once added to a Group, you’ll see a tiny icon show up in the entry for the Group in the Overlays Window. Click the link icon to link the Group. Once linked, the overlays will move together when dragged in the Main Window. To unlink, click the icon again.
Linking and unlinking can also be found in the contextual menu when right-clicking or control-clicking on an Overlay.
Displaying a Series of Overlays
If you need to cycle through a series of Overlays, select an Overlay in the Overlays Window. Then use the Next Overlay and Previous Overlay options in the Overlays menu at the top of the screen, or use the shift^→ and shift^← shortcut keys. The currently selected Overlay will be hidden and then the next Overlay in the list will be shown.
Note: Overlays are always auto-saved as you create and edit them.

