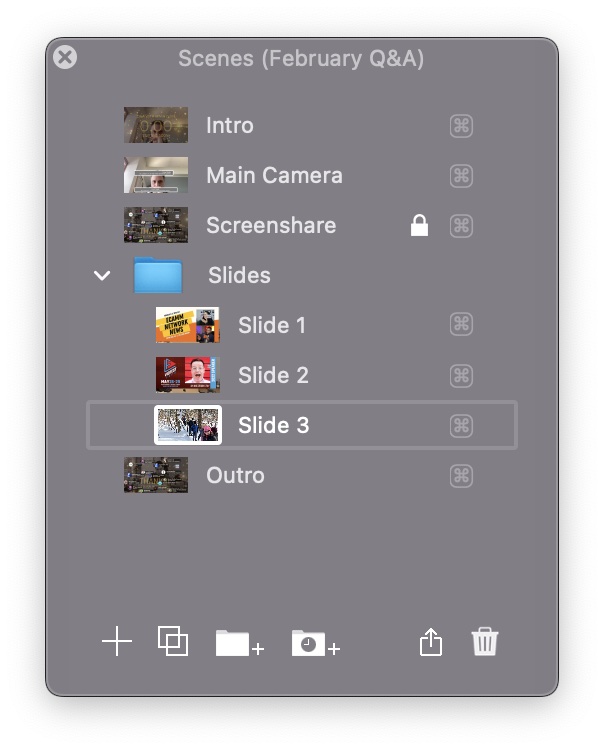
Using Scenes
What is a Scene?
Scenes allow you to quickly switch between presets—including overlays, source modes, and more—during a live stream.
A scene may encompass the following Ecamm Live settings:
- Selected source mode. (Blank, Camera, Screen Share or Video File)
- Selected cameras or guests.
- Screen sharing settings, including zoom.
- Video File mode’s When Video Scene Starts and When Video Ends setting.
- Picture-in-picture visibility, size, shape and position.
- Overlays in the SHOW IN CURRENT SCENE section.
- Selected video in Video File mode, found in the Options menu.
- The audio mute settings in the Sound Levels window.
- The Crop Split Screen setting, found in the Options menu.
- The Scene’s transition effect, found in the Options menu.
- All green screen settings except for Fade Level. (Fade Level is specific to the selected video source.)
- Zoom & Pan, Mirror, Black & White, Sepia, Blur and Rotate settings in the Camera Effects window.
- Visibility of Interview Mode automatic titles.
Suppose you are running an interview show. You may want to have one Scene where it is you and your guest, both displayed with names below your video. Then you can create a Scene for just your guest’s video and their name, and another for just your video and your name. Then you can quickly switch between all three views during the interview. We recommend taking a little time to plan out your overlays and then orchestrate them using Scenes. It can help your broadcasts go smoothly.
Creating Scenes
Scenes are always auto-saved as you create and edit them.
There are three ways to create a Scene from scratch:
- Scene Menu ➝ New Empty Scene
- Scenes Window ➝ + button.
- Type ⌘B.
You may name your Scene within the Scenes Window. Double-click the title in the Scenes Window to rename it.

Switching Scenes
There are 6 ways you can select a Scene to display:
- Select one in the Scenes menu in the Main Window
- Select one in the Scenes menu at the top of the screen.
- Click the Scene’s icon in the Scenes Windows.
- Keyboard shortcut for Scenes 1–9 (⌘+digit) found in the Scenes menu.
- Assign a custom shortcut key by clicking the ⌘ icon to the right of each Scene in the list.
- Keyboard shortcut for next or previous Scenes
- ⌘ → Next (higher number, lower in Scenes Window)
- ⌘ ← Previous (lower numbers, higher in Scenes Window)
Modifying Scenes
- Select your Scene in either the Scene menu or the Scenes Window.
- Modify your Scene with overlays, set a camera, video, or screen share mode, etc.
- The Scene is automatically saved while you edit it.
Pro Tip: When you have more than one Scene, it’s useful to give them a clear, distinct name. While you’re live in front of an audience, you don’t want to spend time wondering which Scene is which. In the Scenes Window, double-click the name of the Scene you want to rename. If your stream is scripted, consider putting your Scenes in chronological order before going live. Then you can use the arrow commands ⌘ → and ⌘ ← to quickly jump to the next Scene. For even more organization, see Arranging and Grouping Scenes below.
Duplicating Scenes
To make different Scenes that share common components, it’s easier to create a new Scene based on an existing Scene. To duplicate a Scene:
- Activate the Scene you want to duplicate.
- Scene ➝ Duplicate Current Scene… or click the button in the Scenes Window.
- (optional) Assign a unique name to the new Scene.
- (optional) Modify the Scene as needed.
Arranging and Grouping Scenes
Could your Scenes list use some organization? Simply drag Scenes around to re-order them. Also, try grouping them.
- In the Scenes Window, press the Folder icon.
- Name the folder.
- Drag Scenes to the folder.
- Repeat as desired.
Automatic Scene Groups
Automatic Scene Groups allow you to cycle through a series of scenes automatically.
Create an Automatic Scene Group by clicking the button at the bottom of the Scenes window.
Add scenes as you would a normal scene group folder. To start or stop the automatic scene advance, click the play button.

Click the tiny gear button to change settings:
- Choose to advance through the Scenes sequentially or in random order.
- Choose a time interval in seconds or provide a range to randomize a time interval.
- Choose a transition effect.
Hot Keys
Click the ⌘⃣ symbol to assign a hot key for a Scene. The hot key can include a modifier key (shift, command, option, alt), a combination of modifier keys, or no modifier key.
Locking Scenes
To prevent a Scene from being edited, rearranged, or deleted by mistake, you can lock it by clicking the lock icon next to the Scene title.
Deleting Scenes
With the Scene selected in the Scenes Window,
- Press delete. Or click the icon.
Trash a Scene by mistake? Don’t panic. Edit ➝ Undo. Or ⌘Z.
Saving, Exporting, and Importing Scenes
When you create or modify a Scene, it is auto-saved. If you quit Ecamm Live, and later reopen, all Scenes and settings will be just as you left them. Ecamm Live can, however, import and export Scenes. This allows you to backup your work in a file or share your Scenes to another Mac. Ecamm Live Scene files have an “ecammlive” file extension.

Exporting a Scene
There are two methods to export a file that contains all the settings of a Scene.
- Drag and drop - select one or more Scenes in the Scenes Window, and drag them to the Desktop or a Finder window. To select more than one at once, hold the shift key while clicking each Scene.
- Each selected Scene will appear as a separate file on your Desktop, named the same as the Scene it represents.
- Share button - select one or more Scenes in the Scenes Window, then click the button at the bottom of the Scenes Window. A Save sheet will appear so you can name your file and select where to save it.
- Note that this option can save multiple Scenes in a single file.
Importing a Scene from a File
Double-clicking any Ecamm Live Scene file will launch the app (if necessary) and immediately add the Scenes to your Scenes Window. Dragging a Scene file to the app’s icon will do the same. If the app is already open, you can drag an Ecamm Live Scene file into the Main Window or Scenes Window.
What Is and Is Not in a Scene File
If you have a scene that contains Image Overlays (for example, a .PNG file that is your logo), that image file is embedded within the Scene File. The exception is video files. If a video file is referenced in a Scene, the video file itself is not contained within the Scene File. If your Scene features a video, you’ll want to send the video file to the destination Mac separate from the Scene File. Next, when you import the Scene File, and select the Scene that features a video, a dialog box will announce, “Unable To Play This Movie.” If Ecamm Live still can’t locate the video file, it will prompt you to locate it.
