Integrate Overlays, Scenes and Guests
Once you’ve had guests, you’ll want to use a few more Ecamm Live features to make your show run a little more smoothly, and look more professional.
Let’s make three Scenes for your broadcast, with a few Overlays in each.
Scene 1: introduction
Scene 2: main presentation
Scene 3: bringing the broadcast to conclusion
What is a Scene?
Scenes allow you to quickly switch between presets—including overlays, source modes, and more—during a live stream. For the moment, we’ll focus on camera sources and overlays.
See also: learn more about Overlays and Scenes in the manual.
Build Scene 1 — Your Introduction
Open your Scenes window if it’s not already visible. At the top of your display, select Scenes menu ➝ Show Scenes Window. There is a default scene available. You can rename it by clicking directly on the Scene name twice. Give your Scene an obvious, unique name like “Introduction”. Clear Scene names are useful since you’ll be selecting them on the fly in front of an audience. You want that to be as easy as possible.
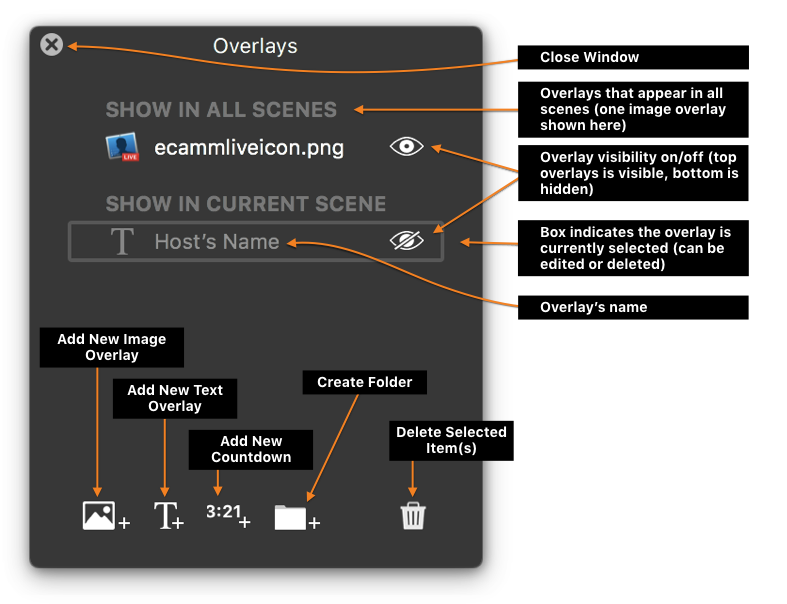
Scenes can contain no overlays, but let’s create an Overlay with our name. Open your Overlays window if it’s not already visible. At the top of your display, select Overlays ➝ Show Overlays Window. At the bottom of the Overlays window, click the New Text Overlay button. A overlay editor appears over the Main Window. Type your name into the Text field. Experiment with a few style options, like typeface and color. Click Add when you’re ready.
Your Text Overlay appears in the middle of the Main Window. You may drag it wherever you like. If your camera switcher bar appears, you can drag that out of the way, if needed. If the Overlay needs to be resized, you can drag from bottom-right corner, or use the pinch/zoom gesture on a trackpad to do so.
See also: Full Details on editing Text overlays in our manual.
You can add as many Overlays as you’d like to your Scene. Let’s add a second—an image you can use for your logo. We’ll start by clicking the Image Overlay Button. A file selection browser will appear over the Main Window. Select your image, then click Open to have it appear on the Main Window. You can now drag it into position, and resize as needed.
These two overlays are now listed under the Overlays menu ➝ Show in Current Scene heading. You have the option of dragging any Overlay up to the Show in All Scenes section of the window. When you create new scenes afterwards, these will automatically appear in those scenes. Since this is handy for something like a logo, let’s drag the Image Overlay into the Show in All Scenes area.
Build Scene 2 — You and Your Guest
In the second scene, we’ll display both you and your guest, and both of your names. In Scenes Window, click the + icon to create a new Scene. The Main Window will switch to the new scene immediately. Name your new scene. If you have your logo Overlay set to “Show in All Scenes”, it will appear on the Main Window in the same place as in the previous scene.
Before we set the overlays, we’ll want to set the camera sources. This way we can next align the name overlays with the layout of the participants. The layout of the participants depends on the order in which you click their boxes in the Video Source Switcher. Hold the shift key while making your selection. The first source you click will fill the screen. The second source you click will take up the right 50% of the screen, with your first source shrinking to the left to make room, automatically.
Note: If you select additional sources, they will be added to the right, automatically dividing the screen evenly. If you keep going, Ecamm Live will start making rows, going as high as 3 rows of 3, if you’re truly adventurous. Only 5 sources can be from Skype, however.
Return to the Overlays Window. Click the New Text Overlay Button to create a new Overlay—let’s make it our guest’s name—edit it to your liking, and save it. Move it to your desired position, near where their face will appear in the split screen, within the Main Window.
In the Scenes Window, select the previous Scene—click the icon to the left of the Scene name to activate it. Note how the Main Window changes. Each scene automatically gets its own numbered keyboard shortcut, ⌘1–9, according to the order of the scenes, top-to-bottom. If your Scenes Window is hidden, you can still use the keyboard shortcuts or the Scenes dropdown menu in the Main Window or at the top of your display.
Note: Make sure you press the ⌘ key to activate the Scenes keyboard shortcuts. Pressing the number will select different camera sources.
We need another overlay in this scene for your name, which we’ve already created in the previous scene. If you want an overlay to appear in more than one scene (but not all scenes, as we have done with with the logo), we can duplicate an overlay in a different scene.
In the Scenes window, select the first scene. In the Overlays window, select your name overlay. Then drag it to the second scene in the Scenes window. This will create a duplicate in the second scene, while leaving the original overlay in the first scene. Now select the second scene, and adjust the placement of the overlay in relation to where your face will appear. Now both spaces should be set, with names in the appropriate places.
Build Scene 3 — Your Conclusion
What would be appropriate to place on the screen when you conclude your broadcast? Use what you’ve learned so far to create a third and final Scene, and add the Overlays you would like to appear.
Now you’re ready to go live with a more sophisticated setup.
Start Your Broadcast
You’ve done this before. You’re practically a pro at this point. Let’s just outline the second broadcast process for you:
- Double check that your Scenes are listed in your preferred order. Select your first scene.
- In Skype, make a call to your guest. Remember their audio is live as soon as you’re connected.
- Start your broadcast. Press Go Live. Introduce the show with Scene 1 selected.
- When ready, switch to Scene 2 by clicking the Scene icon within the Scenes Window, or by selecting it in the Scenes dropdown menu. This brings in your guest for the interview.
- When ready, switch to Scene 3 with ⌘3. This dismisses your guest’s video. Bring your show to a conclusion.
- Press Finish to end your broadcast.
- Disconnect your Skype call.